
How to Setup Enhanced Conversions in Google Ads
If you want to setup Enhanced Conversions in Google Ads, this step-by-step guide is exactly what you need.
2. Why Use Enhanced Conversions?
With increasing privacy restrictions (iOS updates, Chrome cookie deprecation, GDPR), traditional pixel-based tracking is losing accuracy. Enhanced Conversions is Google’s answer to this problem.
- Recovers conversions lost due to cookie blocking or private browsing
- Improves cross-device conversion tracking accuracy
- Gives your Smart Bidding strategy more accurate data to optimize bids
- Helps in measuring true ROI from your Google Ads campaigns
- First-party data is encrypted, fully GDPR & privacy-compliant
- Can improve reported conversions by 5–15% in most accounts
That’s why learning how to setup Enhanced Conversions in Google Ads correctly is one of the best investments for your campaign performance.”
3. Requirements Before Setup
Before you start, make sure you have all of these in place:
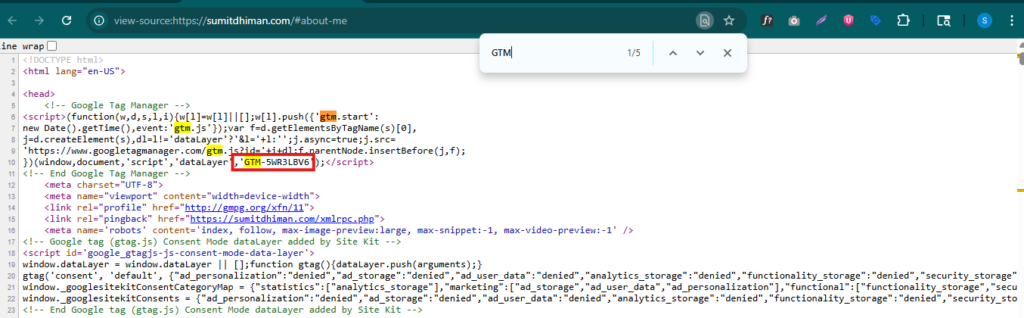
- Google Tag Manager (GTM) installed and verified on your website
- A Google Ads conversion action already created (e.g., Lead Form Submission)
- Your form submission tag (e.g., Thank You page trigger or form submit event) is properly firing in GTM
- Access to your website’s HTML/code (or a developer) to inspect form fields
- Your form collects at least one of: Email Address or Phone Number
For official documentation, refer to Google’s Enhanced Conversions setup guide
4. Step-by-Step Guide to Setup Enhanced Conversions in Google Ads Using GTM
This setup has two parts: first configure settings inside Google Ads, then set up the actual data collection tag inside Google Tag Manager.
Part A: Google Ads Settings
1 Enable Enhanced Conversions in Google Ads Account Settings
Go to Google Ads → Tools & Settings → Measurement → Goals. In the top-right area, click “Settings”. Scroll to find “Enhanced conversions for leads” and toggle it ON.
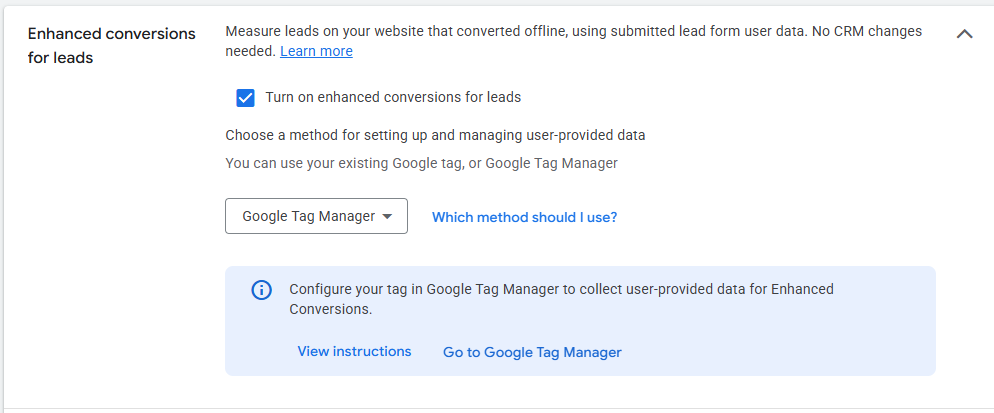
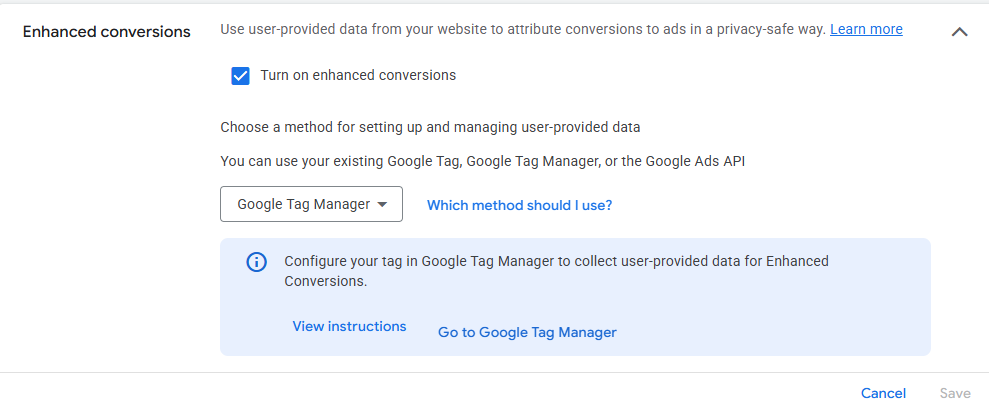
2. Select “Google Tag Manager” as the Method
After enabling Enhanced Conversions, you’ll be asked to select the implementation method. Choose “Google Tag Manager” and save.
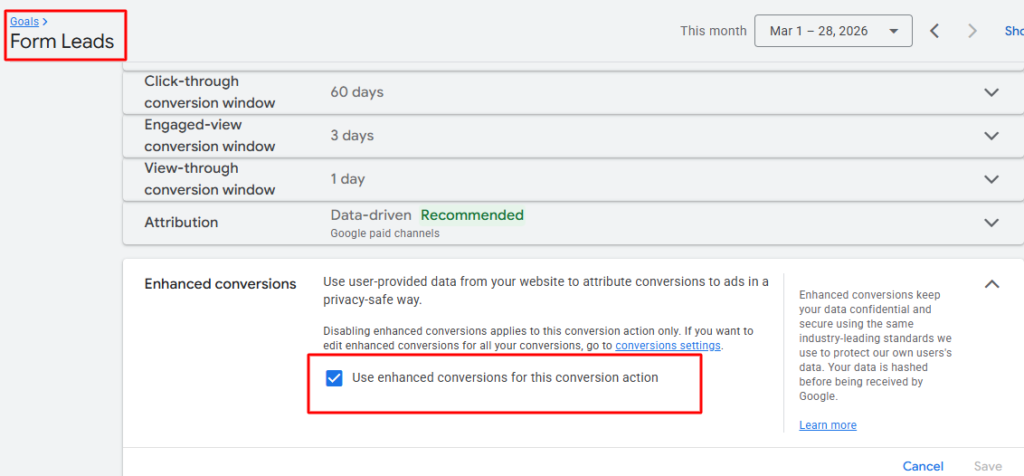
3. Enable Enhanced Conversions on Your Specific Conversion Action
Go back to Goals → Conversions. Open your Lead Form conversion action. Scroll down and find the “Enhanced conversions” option. Enable it and select “Google Tag Manager”. Save the changes.
Part B: Google Tag Manager Setup
Inside GTM, you need to create a tag that captures email/phone from your form and sends it to Google in a hashed format. There are two methods to do this:
5. How to Turn On Enhanced Conversions in Google Ads — Automated & Manual Method
Method 1
Automated Method (Recommended — Try This First)
This method lets Google automatically detect and extract user-provided data from your form. It’s faster to set up but doesn’t always work depending on your form structure.
1. Create a New Tag in GTM
In GTM, go to Tags → New. Click “Tag Configuration” and choose Google Ads as the tag type.
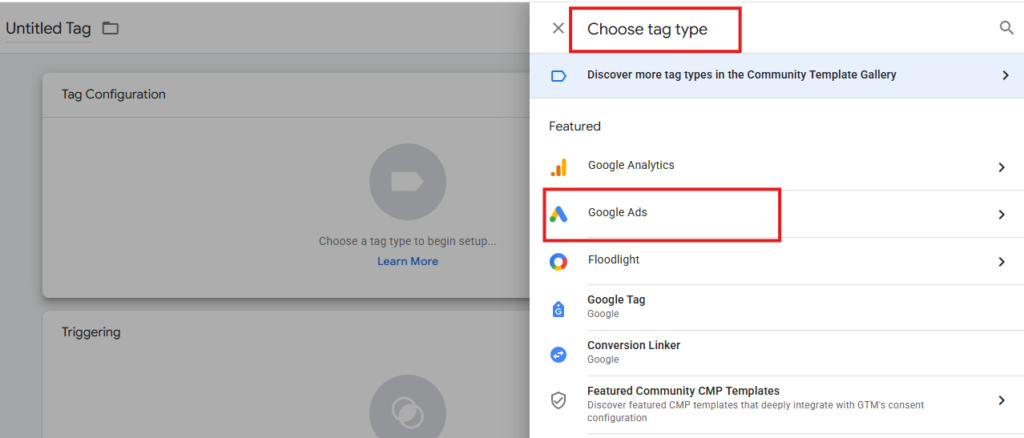
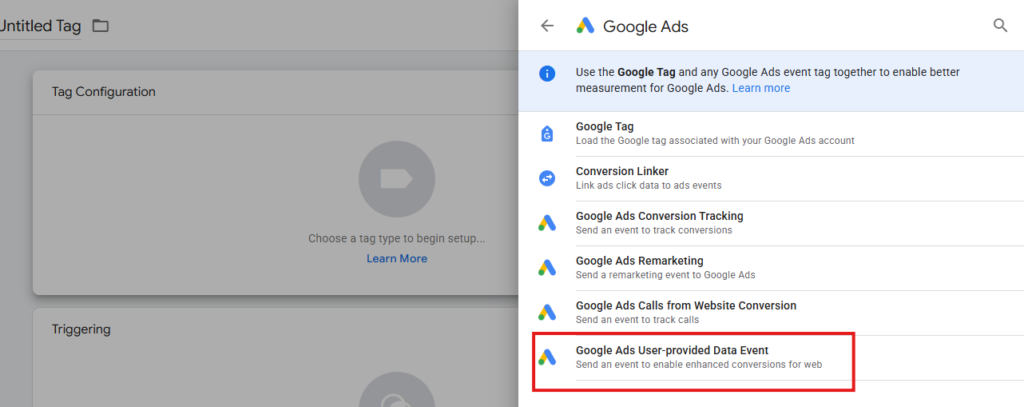
2 Select “Google Ads User-Provided Data Event”
After selecting Google Ads, choose “Google Ads User-Provided Data Event” from the tag type list.
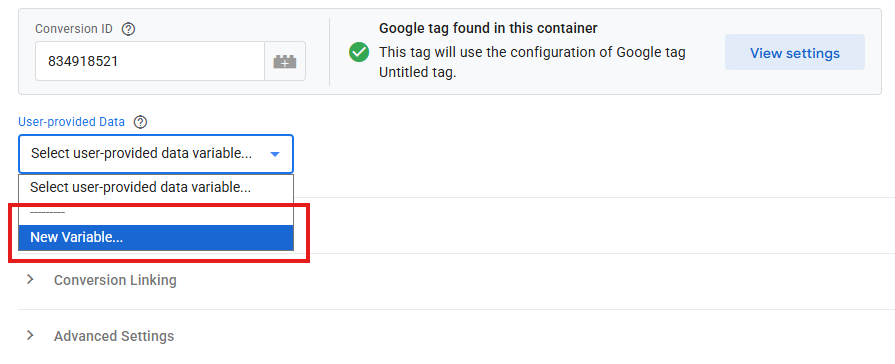
3 Enter Your Conversion ID
Add your Google Ads Conversion ID (found in your Google Ads conversion action settings). Under “User-Provided Data”, click “New Variable”.
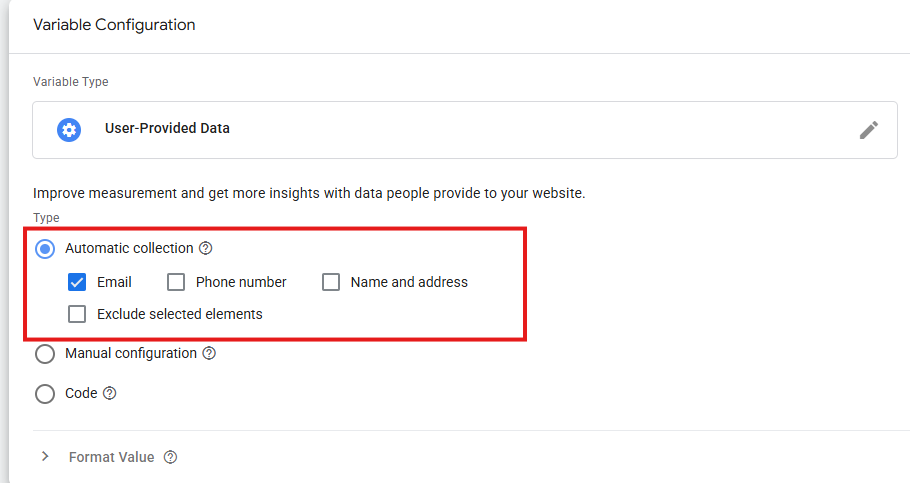
4 Select “Automatic” Collection Method
In the new variable window, you’ll see two options: Automatic and Manual. Select Automatic. Give this variable a name like “Enhanced Conversion – Auto”. Click Save.
5 Set Your Trigger
Add the same trigger that fires your existing lead conversion, typically a Thank You page pageview trigger or a Form Submit trigger. Save the tag.
Manual Method (More Reliable — Use if Auto Fails)
This method manually extracts the email and phone value directly from your form fields using CSS Selectors. It requires a small amount of technical inspection but is far more reliable.
Step 1: Find the CSS Selector for Email Field
1.Inspect Your Form’s Email Field
Go to your website’s contact/lead form. Right-click on the Email input field → Inspect. You’ll see the HTML element highlighted in the browser DevTools.
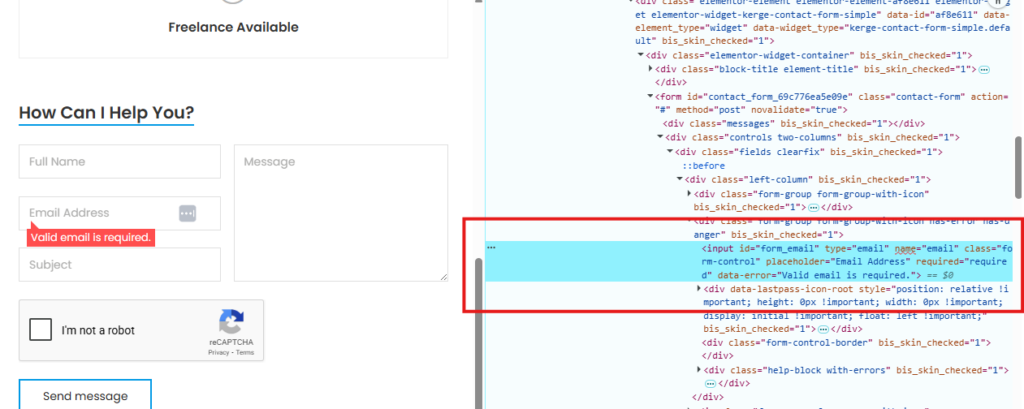
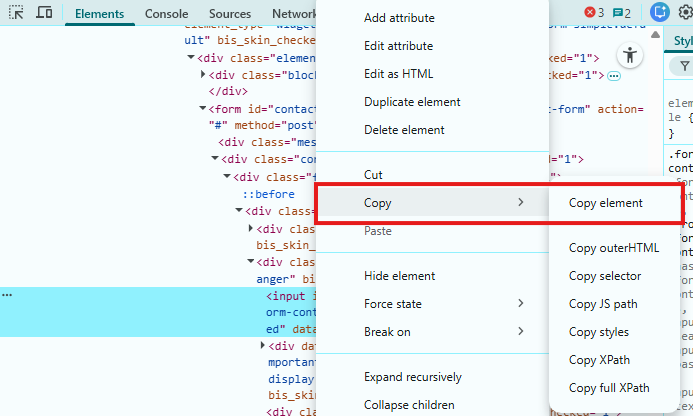
2 .Copy the CSS Selector (Using ChatGPT)
In DevTools, right-click the highlighted element → “Copy” → “Copy Element”. Paste the HTML code into ChatGPT and use this prompt:
"Give me the best CSS selector from this element to fetch the value of the email field."
ChatGPT will give you a precise CSS selector. Copy it.
Step 2: Create DOM Element Variables in GTM
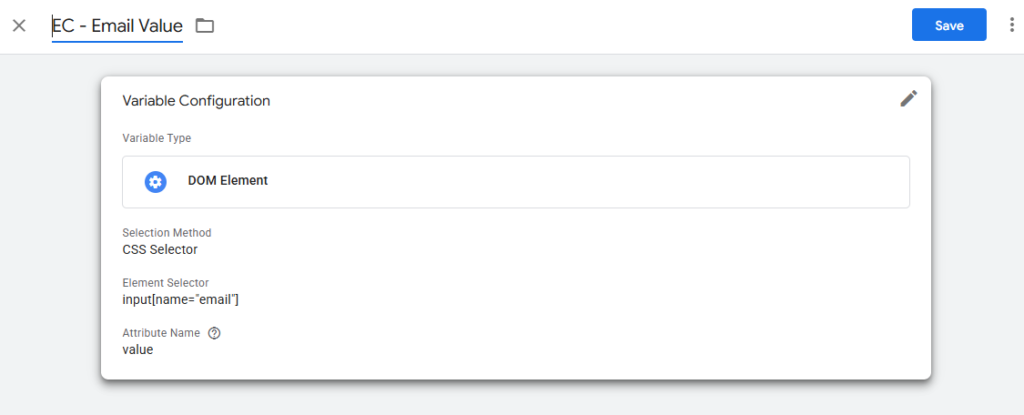
3. Create Variable for Email
In GTM, go to Variables → New Variable. Choose “DOM Element” as variable type. In the CSS Selector field, paste your email CSS selector. Name it “EC – Email Value”. Save.
4. Create Variable for Phone
Repeat the same steps for the phone number field. Name it “EC – Phone Value”. Save.
Step 3: Set Up the Manual Tag
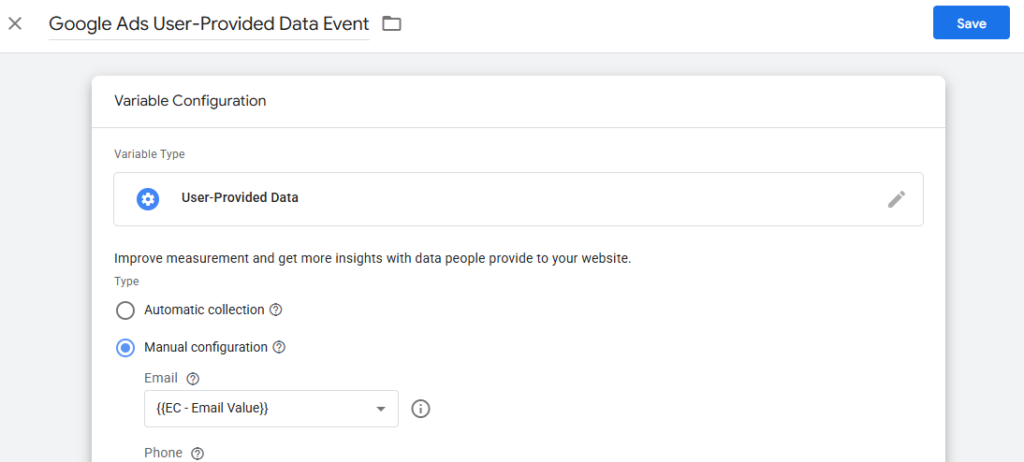
5.Configure the Tag with Manual Data
Create a new GTM tag → Google Ads User-Provided Data Event → enter your Conversion ID → click “New Variable” → this time select “Manual” instead of Automatic.
In the Manual configuration fields, map:
- Email: Select your “EC – Email Value” variable
- Phone: Select your “EC – Phone Value” variable
6. Add Trigger & Save
Add the same trigger as your base conversion (Thank You page or form submit). Save the tag. You’re almost done!
6. How to Check if Enhanced Conversions Are Working
After you setup Enhanced Conversions in Google Ads, the first thing you should do is verify it’s working correctly
1. Open GTM Preview Mode
In GTM, click Preview (top right). Enter your website URL. A GTM debugger panel will open at the bottom of your site.
2. Fill Out the Lead Form
Go to your website’s lead form and start filling it out with a real email and phone number. Do NOT submit yet.
3. Check Variables in the GTM Debugger
In the GTM debugger panel, click on the “Variables” tab. Look for “EC – Email Value” and “EC – Phone Value”. If you can see your actual email and phone number filled in, the variables are working correctly.
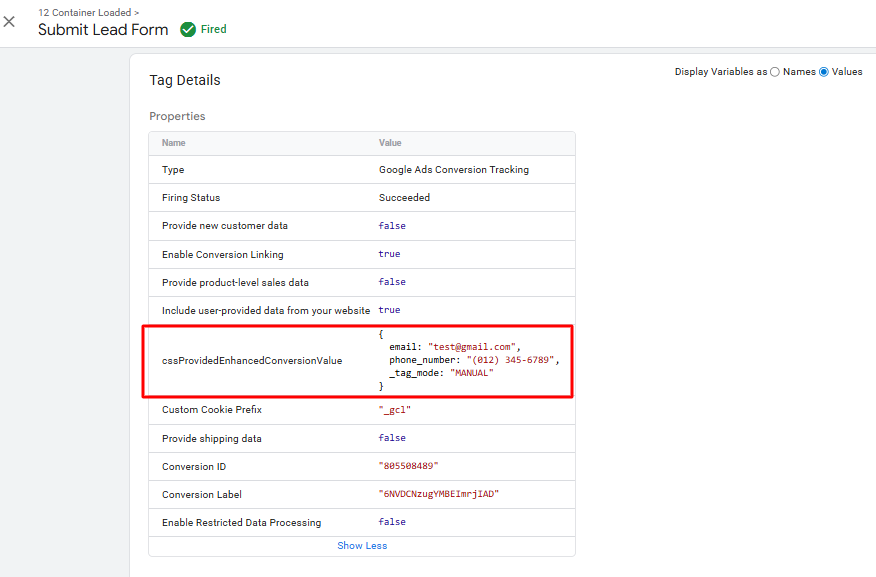
4. Submit the Form & Verify Tag Fires
Submit the form. In the GTM debugger, check the “Tags Fired” section. Your Enhanced Conversion tag should appear as “Fired”. If it shows “Not Fired,” check your trigger settings.

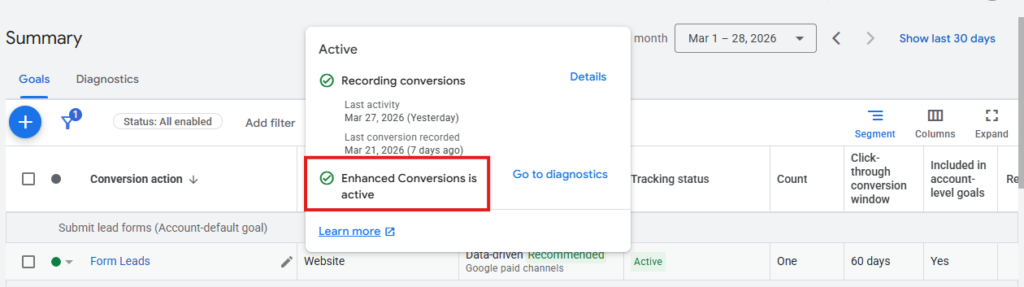
Verify in Google Ads (after 24–48 hours)
After publishing and getting some real conversions, go to Google Ads → Tools → Measurement → Goals → Conversions. Look for a column called “Enhanced Conv.” If it starts showing data, your setup is confirmed working.
7. Common Issues & Fixes
Here are the most common problems people face with Enhanced Conversions — and exactly how to fix them:
| Error | Cause | Fix |
|---|---|---|
| Variables showing blank | CSS selector is wrong or email field isn’t found by GTM | Re-inspect the form field, re-copy the element, use ChatGPT to get a more specific CSS selector |
| Tag not firing | Trigger is misconfigured or not matching the correct page/event | Check your trigger type. If using Thank You page, ensure the URL pattern matches exactly |
| Thank You page issue — no form value | Form values are not available on the Thank You page (different page load) | See “Advanced Fix” below — pass form values to Thank You page using GTM |
| Enhanced Conv. showing 0 in Google Ads | No matching Google accounts found, or data was sent incorrectly | Wait 48–72 hours. Ensure you’re sending real email addresses (not test@test.com) |
| Automated method not capturing data | Form structure not recognized by Google’s automatic detector | Switch to Manual method using DOM Element variables |
Advanced Fix: Thank You Page Not Passing Form Values
This is the most common real-world issue. When you redirect to a Thank You page after form submit, the form field values are gone — the new page has no memory of what the user typed.
Solution: Use GTM to capture email and phone values at the moment of form submission, store them temporarily, and then pass them to the Thank You page. Here’s the approach:
- Create a GTM trigger that fires on the form submit event (before page redirect)
- Capture email/phone values in DOM Element variables at that moment
- Store the values using GTM’s dataLayer or URL parameter passing
- On the Thank You page, read those stored values and send them with the Enhanced Conversion tag
8. FAQ Section
1. What is Enhanced Conversion in Google Ads?
2. How does Enhanced Conversion work?
3. Is Enhanced Conversion the same as Enhanced Conversions for Web?
4. Why use Enhanced Conversions in Google Ads?
5. Does Enhanced Conversion work without GTM?
6. How long does it take for Enhanced Conversions to show data?
7. Is it safe to send email and phone data to Google?
Ready to Set Up Enhanced Conversions?
Enhanced Conversions is one of the highest-impact tracking improvements you can make to your Google Ads account in 2026. It takes about 30–60 minutes to set up properly and can significantly improve your conversion data quality.
If you face any issues with setup, especially the Thank You page value passing scenario, feel free to reach out.